Devices based on in-plane switching have a limited scalability potential due to the elliptical shape required to achieve a sufficiently strong IMA. To achieve higher densities, a cylindrical FL is required, which can be realized through
interfacial PMA. However, since the spin polarization generated by the SHE and RE is in-plane, the typical bilayer SOTs cannot deterministically switch a perpendicularly magnetized FL alone. The first demonstration of SOT
switching of a FL with PMA was reported by Miron et al. [39], where they showed that SOTs in a Pt/Co/AlOx bilayer can switch the magnetization of the Co layer in the presence of an external magnetic field along the
current direction. The external magnetic fields are typically Oersted fields generated from adjacent current-carrying wires, which is not ideal for practical applications, as it complicates the architecture of the memory array.
Furthermore, Oersted fields scale with the current, not the current density, which makes them less effective as devices are scaled down, thus making them detrimental to achieving high densities. Nevertheless, field-assisted SOT
switching was a crucial step toward practical SOT-MRAM devices and has been widely studied both experimentally and theoretically. This section explores the switching of a FL with PMA using the combined interplay of SOTs
and an external magnetic field.
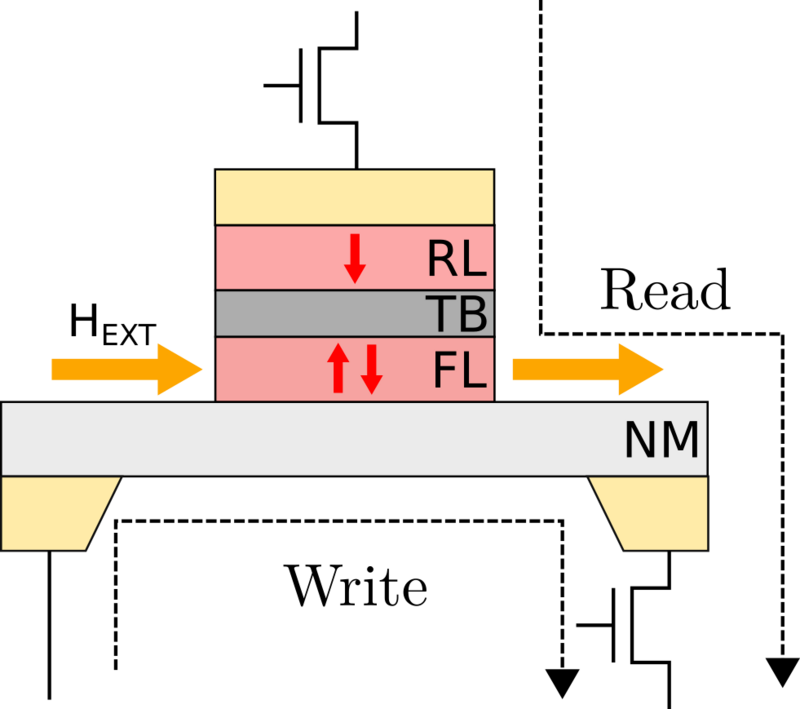
(a) Device
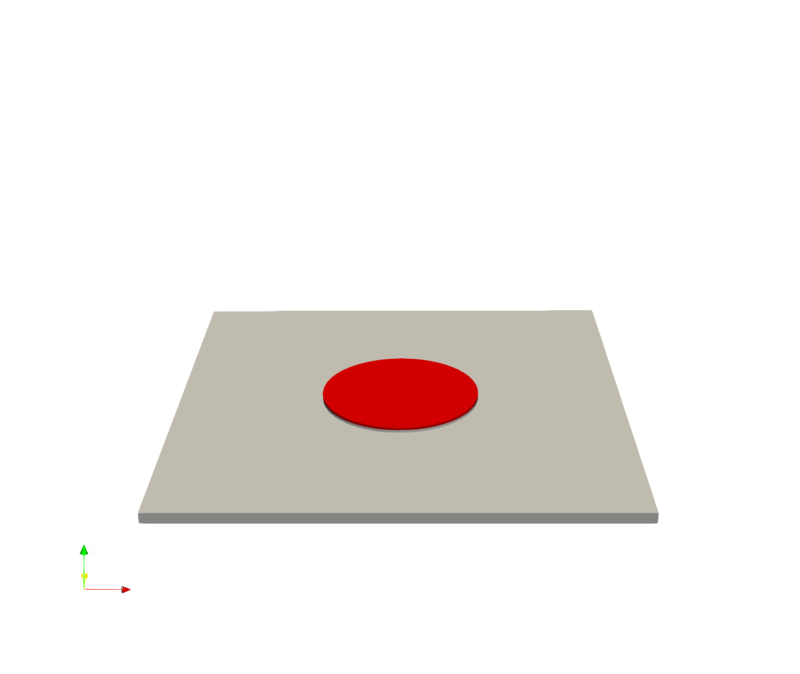
(b) Mesh
Figure 8.4: Schematic of an PMA SOT-MRAM device with an external magnetic field (a), and the corresponding mesh used for the simulations (b). Red arrows indicate the magnetization direction of the FL and RL. The
dashed lines indicate the path of the read and write currents. The yellow arrows indicate the direction of the external magnetic field \(H_{ext}\).
Instead of an elliptical FL, the interfacial PMA allows for a circular FL, which is more scalable. Figure 8.4a shows the structure of a typical PMA SOT-MRAM device with an
external magnetic field applied along the \(x\) direction to enable deterministic switching. The mesh used for the simulations is shown in Fig. 8.4b. For the same reasons as
before, the TB and RL are again excluded from the simulations. The geometry is the same as the previous section, except for the FL having a circular cross-section with a diameter of 60 nm. The resulting mesh consists of
approximately \(22000\) elements. The parameters for Pt and CoFeB are again used for the NM and FM layers, respectively.
Figure 8.5: The \(z\)-component of the volume averaged magnetization and the applied current density as a function of time for four possible switching modes.
(a): \(-z\) to \(+z\) switching, with the current pulse along \(-x\) and \(H_{ext}\) along \(+x\).
(b): \(+z\) to \(-z\) switching, with the current pulse along \(+x\) and \(H_{ext}\) along \(+x\).
(c): \(+z\) to \(-z\) switching, with the current pulse along \(-x\) and \(H_{ext}\) along \(-x\).
(d): \(-z\) to \(+z\) switching, with the current pulse along \(+x\) and \(H_{ext}\) along \(-x\)
Figure 8.5 shows the magnetization switching of the FL driven by SOTs from a current pulse with a density of \(j_\mathrm {SOT} = 4.5 \times 10^{8} \, \mathrm
{A/cm^2}\) and a duration of \(0.2\) ns in the presence of an external magnetic field of \(H_\mathrm {ext} = 80\) mT. Four different switching modes are possible depending on the initial magnetization direction of the FL, the
direction of the current pulse, and the direction of the external magnetic field. Switching from \(-z\) to \(+z\) can be achieved with a current pulse along \({\mathbin {\textpm }} x\) if the external magnetic field is along \(\mp
x\), while switching from \(+z\) to \(-z\) can be achieved with a current pulse along \({\mathbin {\textpm }} x\) if the external magnetic field is along \({\mathbin {\textpm }} x\). The time evolution of the magnetization
appears to be identical or mirror symmetric for the switching modes in the same or opposite directions, respectively. In contrast to the in-plane case, there is no incubation time as the spin polarization generated by the SHE and RE
is orthogonal to the initial magnetization direction, allowing the SOTs to start switching the magnetization immediately.
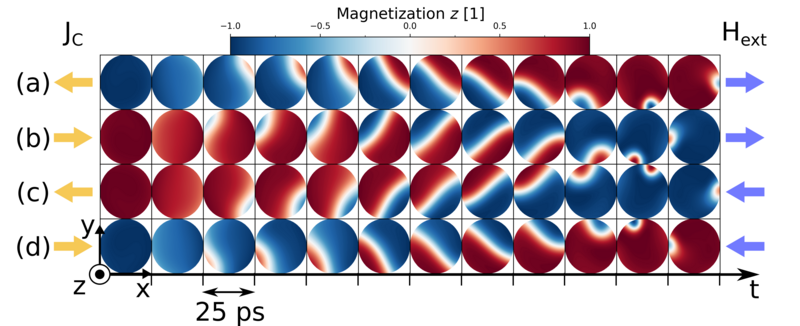
Figure 8.6: The spatial distribution of the \(z\)-component of the magnetization in the center of the FL at different time steps during the switching process. Each snapshot is taken at 25 ps intervals from the moment the
pulse is applied. The four possible switching modes (a-d) are shown, where the yellow and blue arrows indicate the direction of the current pulse and the effective field, respectively.
Figure 8.6 shows the spatial distribution of the magnetization at different time steps during the switching process for all four switching modes. The different modes exhibit a
fourfold symmetry in the resulting magnetization dynamics. The switching is characterized by a domain wall nucleating at the edge \({\mathbin {\textpm }} 45^\circ \) or \({\mathbin {\textpm }} 135^\circ \) relative to
the \(x\) axis, depending on the mode, which propagates across the FL to the opposite edge. Once the current is turned off, the current independent effective field completes the switching, which can be observed in the remaining
unswitched domain rotating around the edge of the FL while shrinking until the switching is complete.
The fourfold symmetry of the nucleation point can be understood by considering the interplay between the DMI, the external field, and SOTs. The DMI induces a symmetric canting of the magnetization at the edges towards the
center of the FL. When the external field is applied, this canting angle increases on one side and decreases on the opposite side of the FL, thus favoring nucleation on the side with the largest canting. Thus, for a NM layer with a
positive spin Hall angle, once the current pulse is applied the DL torque initiates a nucleation on the side with the strongest canting if the current and external field are aligned, and the initial state is along \(+z\); or if the current
and external field are anti-aligned, and the initial state is along \(-z\). This explains the left-right symmetry of the nucleation. The top-bottom asymmetry arises from the FL torque. The FL either opposes or assists the DL torque
depending on whether the angle of the canting with respect to the current direction is positive or negative, respectively. For a negative FL torque, as is the case for Pt, the FL torque opposes the DL torque for a positive canting
angle and aids the DL for a negative canting angle. Thus, for an external field along \(+x\), the FL torque favors nucleation at the top edge, while for an external field along \(-x\) it favors nucleation at the bottom edge. For
negative spin Hall angles, or positive FL torques, the symmetries are reversed. This complex interplay was first observed experimentally in Pt/Co by Baumgartner et al. [145], where identical magnetization dynamics were
observed except for a reversed upper-lower edge symmetry due to the positive FL torque of Pt/Co.