Since the stray field is proportional to the volume of the MHM, scaling the MHM SOT-MRAM is challenging; therefore, switching approaches based solely on currents are preferred, as SOTs scale with the current density. FFS has
been demonstrated through the out-of-plane polarized spin currents in trilayer SOTs in several experimental systems [132, 133, 150]. Recently, its first application in a SOT-MRAM was demonstrated by Cai et al. in devices
fabricated on CMOS-compatible 300 mm wafers [151]. The trilayer SOT-based devices showed a \(\approx 50\%\) reduction in switching current density for the same switching time compared to the previous MHM device. The
clear advantage of a Trilayer SOT-based device is that perpendicular switching is controlled purely through current-induced SOTs, while requiring only a single write path that is separated from the read path.
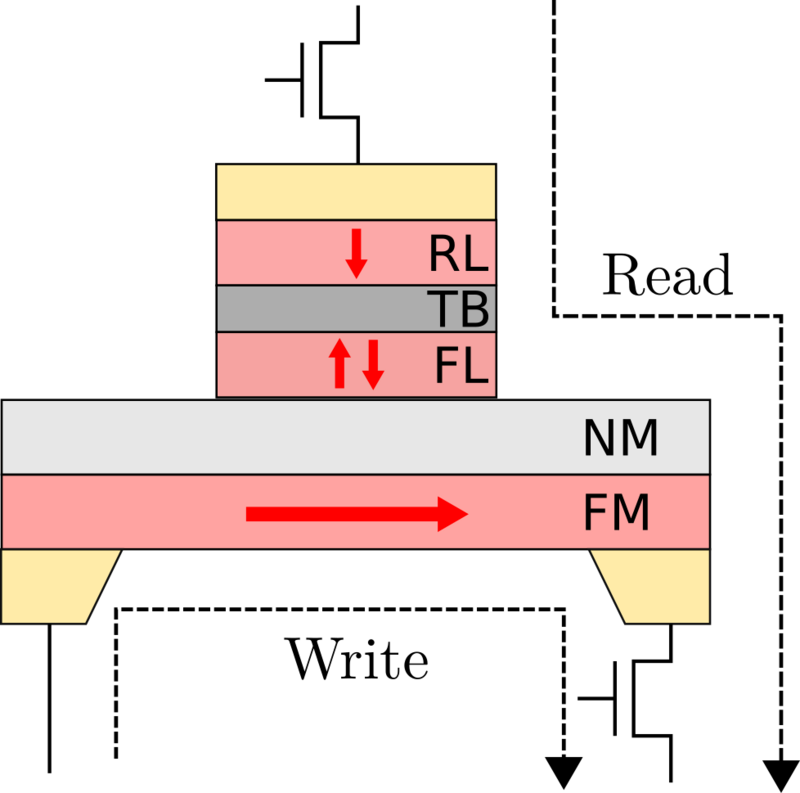
(a) Device
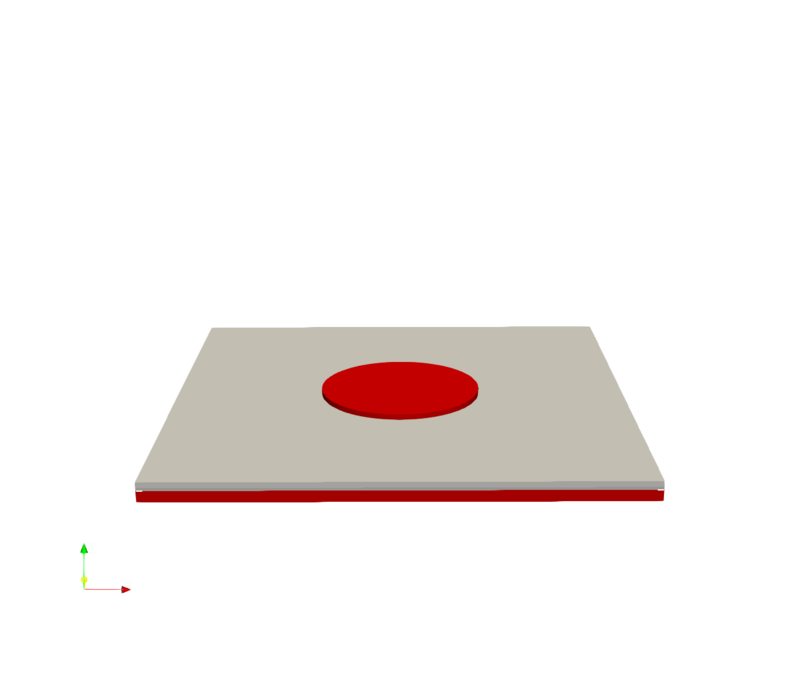
(b) Mesh
Figure 8.14: Schematic of a Trilayer-SOT-MRAM device with PMA (a), and the corresponding mesh used for the simulations (b). Red arrows indicate the magnetization direction of the bottom FM, FL, and RL. The dashed
lines indicate the path of the read and write currents.
The trilayer torque-based device is depicted in Fig. 8.14a, where an additional FM layer is added below the NM SOT layer, thus forming a trilayer with the FL. The
magnetization of the bottom FM layer is pinned along the \(x\)-direction, such that the spin current generated at the bottom interface through SOP has a strong out-of-plane \(z\)-polarization. Figure 8.14b shows the mesh used for the simulations, the cross-section of the FL, and the width of the SOT-track are the same as in the previous sections. The bottom FM layer is \(4\)
nm thick, and the NM layer is \(1\,\si {nm}\) thick to boost the spin current contribution from the bottom FM/NM interface. The material parameters used for the bottom FM and NM are CoFeB and W, respectively. The
resulting mesh consists of approximately \(30000\) elements.
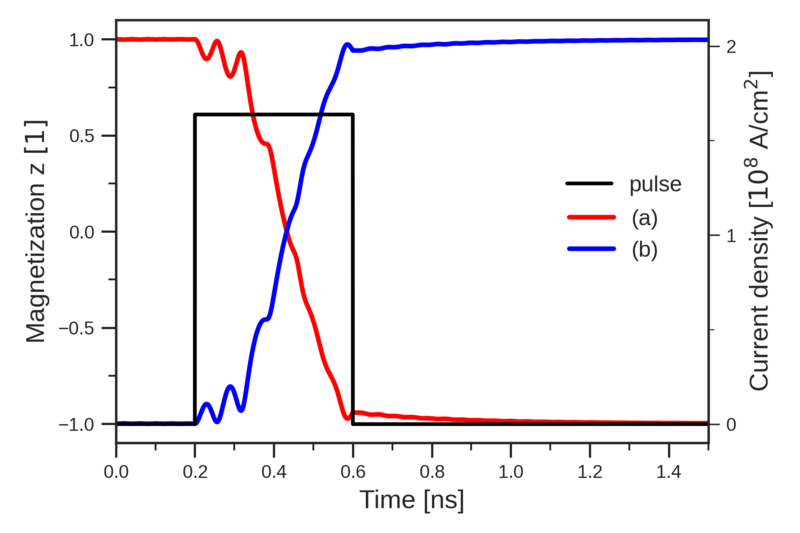
Figure 8.15: The \(z\)-component of the volume averaged magnetization and the applied current density as a function of time. The red curve shows the switching from \(+z\) to \(-z\) with a current along \(+x\) (a), while
the blue curve shows the switching from \(-z\) to \(+z\) with a current along \(-x\) (b).
Figure 8.16: The spatial distribution of the \(z\)-component of the magnetization in the center of the FL at different time steps during the switching process. Each snapshot is taken at 50 ps intervals from the moment the
pulse is applied. The yellow arrows indicate the direction of the SOT pulse.
Figures 8.15 and 8.16 show the time evolution of the volume-averaged magnetization and magnetization distribution, respectively. A
voltage bias of \(0.10\,\si {V}\) is applied across the SOT track for \(0.4\,\si {ns}\), resulting in a write current density of \(j_\mathrm {SOT} \approx 1.6 \times 10^{8} \, \si {A/cm^2}\). Switching from \(+z\) to
\(-z\) is achieved with a current pulse along \(-x\), while switching from \(-z\) to \(+z\) is achieved with a current pulse along \(+x\). The switching is characterized by a domain wall nucleating at either the left or right edge,
which propagates across the FL in a direction opposite to the current direction.
The left-right nucleation symmetry requires a different explanation than the previous systems with PMA, and can be understood by analyzing the combined interaction of the bilayer and trilayer torques on the canted edge
magnetization. As there is no external field, the canting towards the center due to the DMI is symmetric around the edge of the FL at the beginning of the switching. The trilayer geometry with an in-plane bottom magnetization
introduces a torque that damps the magnetization towards the \(z\)-axis; however, it does not favor any specific nucleation point as it acts symmetrically along the edge. At \(1\,\si {nm}\) NM layer thickness, the FL torque of
the bilayer torques dominates over the DL torque. Moreover, it is the strongest at the left and right edges, as the tilted magnetization is orthogonal to the bilayer polarization direction \(\bm {E}\times \bm {z}\). The bilayer FL
torques induce a rotation of the magnetization around \(\bm {E}\times \bm {z}\). Consequently, the trilayer torque complements the FL torque on one side of the FL, while opposing it on the other side. Thus, the combined
torque on the canted magnetization favors nucleation on either the left or the right edge, depending on the spin-Hall angle, current direction, and bottom-layer magnetization direction.
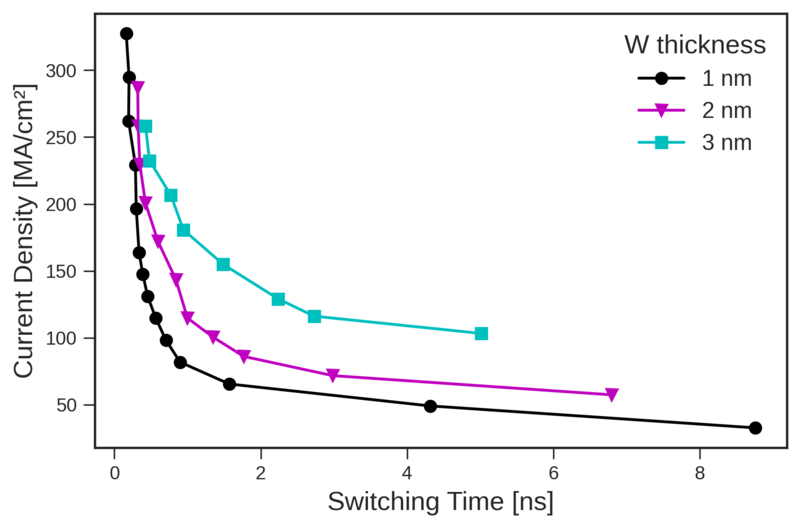
Figure 8.17: Applied current density versus switching for FFS with trilayer SOTs. The simulations were performed on the mesh shown in Fig. 8.14b for a range of
current densities and different thicknesses of the W layer. The bottom FM and FL were modeled as CoFeB, while the NM layer was modeled as W.
The switching performance is shown in Fig. 8.17 for different thicknesses of the W layer. Compared to the MHM device, the trilayer device can operate at a wide range of
current densities and switching times; the switching time improves with increasing current density, saturating at \(0.16\,\si {ns}\) for current densities above \(300\,\si {MA/cm^2}\). Moreover, switching using a current
density as low as \(37\,\si {MA/cm^2}\) was achieved, with a switching time exceeding \(8\,\si {ns}\). For increasing W thickness, the performance degrades, which is attributed to the reduced SOT-efficiency and \(z/y\) spin
polarization ratio at larger thicknesses.
Trilayer SOT-based FFS is a promising approach for SOT-MRAM devices, due to its switching speed, energy efficiency, and scalability. Moreover, it was demonstrated that combining VCMA with these devices can further enhance
their energy efficiency, while simultaneously enabling the selective switching of multiple MTJs on the same SOT track [151], thereby opening up the possibility for SOT-MRAM to rival the density of STT-MRAM. However, the
approach comes with its own challenges, which include the shunting of the write current through the bottom FM layer, which can be mitigated by using a more conductive NM layer. Furthermore, the SOTs strongly affect both FM
layers; thus, failing to properly pin the bottom FM layer magnetization could lead to unwanted switching of this layer, thereby decreasing the device’s reliability. Finally, the thin NM layer could lead to increased interlayer exchange
interaction and DMI between the two FM layers [152, 153], which could potentially have detrimental effects on the switching dynamics and reliability.